![]() As part of my Master’s in Management Information Systems program at the University of Illinois – Springfield, we are learning how to build a mobile application. Since there has been a lot of talk about mobile app development and how to get started, it seems only fitting that I share my learning process with you — my students (I know, parallel universe, right?). As usual, I can’t say how important it is to experiment and play outside of class to build your skills. If you’re interested in learning more about mobile apps, I encourage you to follow along in my journey. I’ll continue to update this page as I go through the labs and build appropriate videos for you to follow. The following videos follow Corinne Hoisington’s Android Boot Camp, Third Edition if you’re interested in picking up the text to learn more on your own.
As part of my Master’s in Management Information Systems program at the University of Illinois – Springfield, we are learning how to build a mobile application. Since there has been a lot of talk about mobile app development and how to get started, it seems only fitting that I share my learning process with you — my students (I know, parallel universe, right?). As usual, I can’t say how important it is to experiment and play outside of class to build your skills. If you’re interested in learning more about mobile apps, I encourage you to follow along in my journey. I’ll continue to update this page as I go through the labs and build appropriate videos for you to follow. The following videos follow Corinne Hoisington’s Android Boot Camp, Third Edition if you’re interested in picking up the text to learn more on your own.
Step 1: Install the Android Studio
Step 2: Check to make sure everything is installed properly
A few things I noticed. The Android Studio is a huge download (1.6GB). It takes a bit of time to install and it consumes a chunk of memory when running (about 600MB or more in my experience). The IDE has some nice features. It’s pretty cool to use a virtual mobile device inside the IDE to test out the app. You can use the emulator to render your app in a virtual device of your choice (Nexus 5, for example). Below you’ll find videos of each lab so you can see how the development process works from builing the obligatory Hello World! app to integrating audio into the app.
Lab 1: Voila! Meet the Android
The first lab will introduce you to the Android Studio IDE and the mobile emulator. A simple Hello World application will be created.
Lab 2: Simplify! The Android User Interface
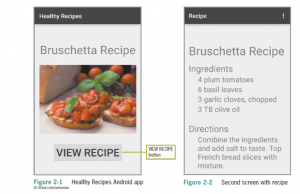
In this 2nd lab, an application will be developed that includes a button action to move from the main screen to a 2nd screen. Widgets such as TextView, buttons, and ImageView will be used to build the application in conjunction with the strings.xml file and Translations Editor. To do this, a 2nd activity will be created that includes the editing of a new Java class file. To follow along with this lab, an image file is used that can be downloaded. The lab will be capped off by testing our new recipe app in the virtual emulator.
Programming Project: Youth Hostel Application
In this exercise, I build a Youth Hostel App that displays information about a given youth hostel. I couldn’t resist finding a hostel in Modena, Italy as I can’t wait to return to my favorite place to visit (well, besides Disney World!). The Italian countryside is probably the most picturesque places I have seen on this planet. This Android app is a continuation of my post from last week, so consider this practice if you’ve been following along. The next lesson on the docket includes input from the user, so stay tuned.
Lab 3: Android User Input, Variables and Operations
In this lab, I incorporate user input, the use of variables in Java, and the use of a spinner as a selection box for the user.
Lab 4: Icons and Decision-Making Controls
In this lab, I build upon the previous labs and incorporate additional options for the controls, use radio buttons, and use Java and if-else statements to control logic in this weight conversion application. Changing the application icon is also discussed.
Lab 5: Arrays and Radio Buttons
In this week’s Android lab, the developer is introduced to arrays in Java as well as using radio buttons in a group. The app is a photo prints app that calculates the cost of a user-specified number of prints.
Lab 6: Lists, Arrays, and URIs
This week’s lab explores the use of lists, arrays, and launching a web browser from a list item. The app is a tourist app that provides details about various sites in Chicago.